This No-Bake Pistachio Cheesecake is a creamy, elegant dessert that comes together without turning on the oven. It has a buttery biscuit crust, a smooth pistachio-infused cheesecake filling, and a light, nutty flavor that makes every bite irresistible. It is perfect for holidays, dinner parties, birthdays, or whenever you want an impressive dessert with minimal effort.
The best part is that this cheesecake needs plenty of chilling time instead of baking. The filling sets beautifully in the refrigerator, creating a soft yet sliceable texture. You can decorate it simply with chopped pistachios or make it extra special with whipped cream, pistachio crumbs, and a drizzle of white chocolate.
Ingredients
For the Crust
- 2 cups finely crushed digestive biscuits or graham crackers
- 6 tablespoons unsalted butter, melted
- 2 tablespoons granulated sugar
- Pinch of salt
For the Pistachio Cheesecake Filling
- 16 ounces (450 g) full-fat cream cheese, softened
- ¾ cup powdered sugar
- ¾ cup pistachio cream or pistachio spread
- 1 teaspoon vanilla extract
- ½ teaspoon almond extract, optional
- 1 cup cold heavy whipping cream
- ½ cup finely ground pistachios
- 1 tablespoon fresh lemon juice
For Decoration
- ½ cup whipped cream
- ¼ cup chopped pistachios
- 2–3 tablespoons pistachio cream, slightly warmed
- Optional white chocolate curls
Instructions
1. Prepare the Crust
Begin by preparing a 9-inch springform pan. Lightly grease the bottom and sides, then line the base with parchment paper if desired. This makes removing the finished cheesecake much easier.
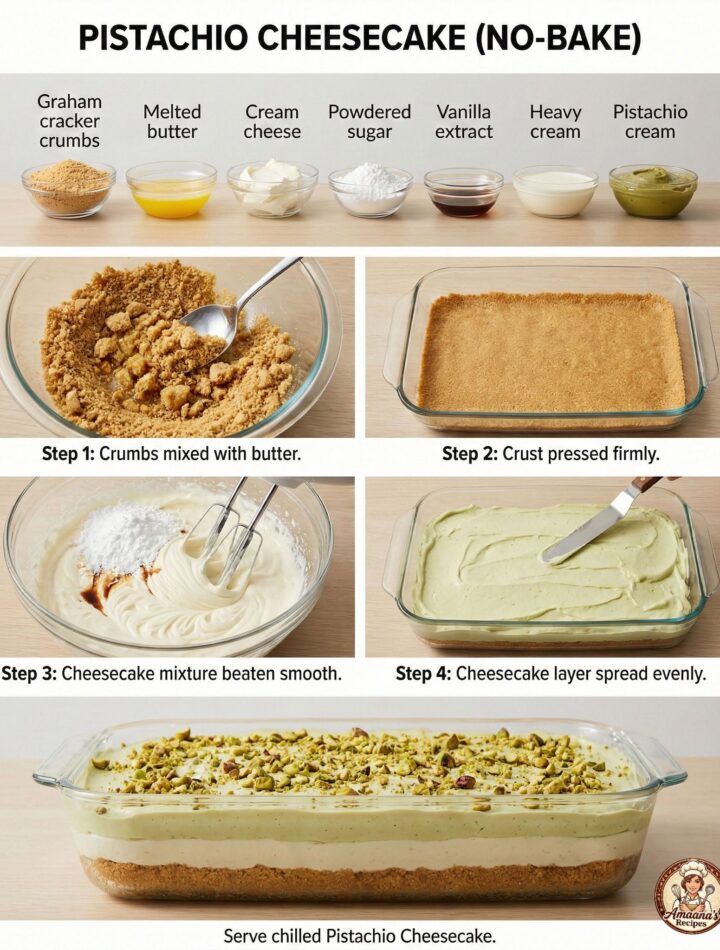
Place the biscuits in a food processor and pulse until they become fine crumbs. You can also place them in a sealed bag and crush them with a rolling pin. Transfer the crumbs to a bowl and add the melted butter, sugar, and a small pinch of salt.
Mix until every crumb is evenly coated and the mixture resembles wet sand. Pour it into the prepared pan and press it firmly into an even layer. Use the bottom of a glass or measuring cup to compact the crust.
Place the crust in the refrigerator for at least 20–30 minutes while you prepare the filling.
2. Make the Cheesecake Filling
Place the softened cream cheese in a large mixing bowl. Beat it with an electric mixer until completely smooth and creamy. Scrape down the sides of the bowl as needed to make sure there are no lumps.
Add the powdered sugar, pistachio cream, vanilla extract, optional almond extract, and lemon juice. Beat again until the mixture is smooth, thick, and evenly combined.
The pistachio cream provides the main pistachio flavor and also gives the cheesecake its beautiful pale green color. For a stronger nutty flavor, choose a good-quality pistachio spread with a high pistachio content.
Next, add the finely ground pistachios and mix gently until incorporated.
3. Whip the Cream
In a separate chilled bowl, pour in the cold heavy whipping cream. Beat on medium-high speed until stiff peaks form. Be careful not to overbeat the cream, as it can become grainy.
Using a rubber spatula, gently fold the whipped cream into the pistachio cream cheese mixture in two or three additions. Fold rather than vigorously stir so the filling remains light and airy.
Taste the mixture and adjust the flavor if desired. If you prefer a slightly sweeter cheesecake, you can add a little more powdered sugar.
4. Assemble the Cheesecake
Remove the chilled crust from the refrigerator. Spoon the pistachio filling over the crust and spread it evenly with an offset spatula or the back of a spoon.
Gently tap the pan on the countertop a few times to release any large air pockets. Smooth the top until it looks even.
Cover the cheesecake with plastic wrap or foil and refrigerate for at least 6 hours, preferably overnight. The long chilling time allows the cheesecake to become firm enough to slice cleanly.
5. Decorate
Once the cheesecake is completely set, carefully remove the sides of the springform pan.
Pipe small swirls of whipped cream around the edge or across the top. Sprinkle generously with chopped pistachios.
For an elegant finishing touch, warm a few tablespoons of pistachio cream very gently until it becomes pourable. Drizzle it over the cheesecake in thin lines. Add white chocolate curls if desired.
For the cleanest slices, place the cheesecake in the refrigerator until you are ready to serve it. Use a sharp knife warmed under hot water, then wipe the knife dry before cutting each slice.
Tips for the Best No-Bake Pistachio Cheesecake
Use full-fat cream cheese for the best texture. Reduced-fat varieties contain more moisture and may produce a softer filling.
Make sure the cream cheese is softened before mixing. Cold cream cheese can leave small lumps throughout the filling.
Cold heavy cream whips more successfully, so keep it refrigerated until you are ready to use it.
Do not rush the chilling process. Although the cheesecake may look firm after a few hours, overnight refrigeration gives it the best structure and flavor.
Press the biscuit crust firmly into the pan. A loose crust can crumble when the cheesecake is sliced.
If you want a more intense pistachio flavor, add a few extra tablespoons of finely ground pistachios to the filling.
Storage
Store the cheesecake covered in the refrigerator for up to 4 days. Keep it chilled until serving because the creamy filling becomes softer when left at room temperature for an extended period.
You can also freeze individual slices. Wrap each slice tightly and place it in an airtight container. Freeze for up to 1 month. Thaw the slices overnight in the refrigerator before serving.
Serving Suggestions
Serve each slice cold with a little extra whipped cream and a sprinkle of chopped pistachios. Fresh berries, raspberries, strawberries, or a drizzle of white chocolate also pair beautifully with the nutty pistachio flavor.
This No-Bake Pistachio Cheesecake is creamy, luxurious, and surprisingly simple to prepare. With its crunchy buttery crust, silky pistachio filling, and beautiful topping, it makes a stunning dessert without any baking required. Prepare it the day before serving for an effortless dessert that is sure to disappear quickly.