A Lemon Curd Tart is a bright, elegant dessert with a crisp buttery pastry shell and a smooth, creamy lemon filling. The tart has the perfect balance of sweet and tangy flavors, making it a refreshing choice for afternoon tea, family gatherings, holidays, or special celebrations. It looks impressive but can be prepared with simple ingredients and a little patience.
Ingredients
For the Tart Crust
- 1 ½ cups all-purpose flour
- ¼ cup powdered sugar
- ¼ teaspoon salt
- ½ cup unsalted butter, cold and cubed
- 1 large egg yolk
- 1–2 tablespoons ice-cold water
- ½ teaspoon vanilla extract
For the Lemon Curd
- ¾ cup fresh lemon juice
- 1 tablespoon finely grated lemon zest
- ¾ cup granulated sugar
- 3 large eggs
- 2 large egg yolks
- ½ cup unsalted butter, cut into small pieces
- 1 teaspoon vanilla extract
- Pinch of salt
For Decoration
- Powdered sugar, optional
- Thin lemon slices or twists
- Fresh berries or mint leaves, optional
Step 1: Prepare the Pastry
Start by making the tart crust. In a large bowl, whisk together the flour, powdered sugar, and salt. Add the cold cubed butter and work it into the flour using your fingertips or a pastry cutter until the mixture resembles coarse crumbs.
Add the egg yolk and vanilla extract. Mix gently until the dough begins to come together. If it seems too dry, add ice water one tablespoon at a time. Avoid adding too much water because this can make the crust tough.
Turn the dough onto a lightly floured surface and gently bring it together into a disk. Wrap it in plastic wrap and refrigerate for at least 30 minutes. Chilling allows the butter to firm up and helps prevent the pastry from shrinking during baking.
Step 2: Roll and Bake the Crust
Preheat your oven to 350°F (175°C).
Roll the chilled dough into a circle slightly larger than your tart pan. Carefully transfer the pastry into a 9-inch tart pan with a removable bottom. Press it gently into the bottom and sides, trimming away any excess dough around the edges.
Prick the bottom several times with a fork. Place a sheet of parchment paper over the crust and fill it with pie weights or dry beans.
Bake for about 15 minutes. Remove the parchment and weights, then return the crust to the oven for another 8–12 minutes, or until the pastry is lightly golden.
Allow the crust to cool while you prepare the lemon curd.
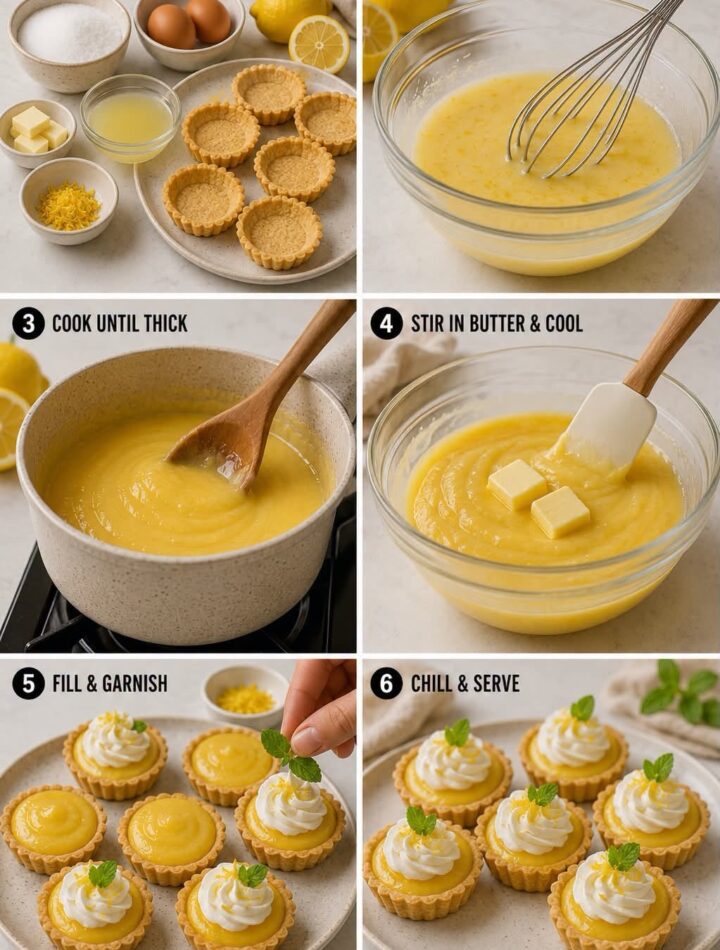
Step 3: Make the Lemon Curd
Fresh lemons give this tart its best flavor, so use freshly squeezed lemon juice rather than bottled juice.
In a heatproof bowl, whisk together the lemon juice, lemon zest, sugar, eggs, and egg yolks until smooth. Place the bowl over a saucepan containing a small amount of gently simmering water. Make sure the bottom of the bowl does not touch the water.
Cook the mixture gently, whisking constantly, until it thickens enough to coat the back of a spoon. This usually takes around 8–12 minutes.
The curd should become smooth and creamy. Avoid allowing the mixture to boil, as excessive heat can cause the eggs to scramble.
Remove the bowl from the heat and immediately whisk in the butter a few pieces at a time. Continue whisking until the butter has completely melted and the curd is silky and glossy.
Stir in the vanilla extract and a pinch of salt. For an exceptionally smooth filling, strain the curd through a fine-mesh sieve before pouring it into the tart shell.
Step 4: Fill the Tart
Pour the warm lemon curd into the cooled pastry shell. Smooth the surface gently with a spatula if necessary.
Place the tart in the refrigerator and chill for at least 2–3 hours, or until the filling is completely set. For the cleanest slices, chilling overnight works especially well.
The filling should be firm enough to slice while remaining soft and creamy in texture.
Step 5: Decorate and Serve
Once chilled, carefully remove the tart from the pan. Dust the top lightly with powdered sugar just before serving.
For a beautiful presentation, garnish with thin lemon slices, small lemon twists, fresh berries, or a few mint leaves. Keep the decoration simple so the vibrant lemon color remains the centerpiece.
Use a sharp knife to cut the tart into wedges. Wipe the knife between slices for neat, professional-looking portions.
Helpful Tips
Use fresh lemons: Freshly squeezed juice and freshly grated zest provide a much brighter flavor.
Keep the butter cold: Cold butter helps create a tender, crisp pastry crust.
Do not overwork the dough: Mix just until the ingredients come together. Overworking can produce a firm crust.
Chill before baking: A chilled tart shell is less likely to shrink while baking.
Cook the curd gently: Constant whisking and moderate heat help create a smooth filling without scrambled eggs.
Strain the curd: Passing the cooked curd through a sieve removes any tiny pieces of cooked egg or zest and creates an especially silky texture.
Let it set completely: Resist cutting the tart while it is still warm. The lemon curd needs time to firm up.
Storage
Store leftover Lemon Curd Tart covered in the refrigerator for up to 3–4 days. Because the filling contains eggs and butter, keep the tart chilled until ready to serve.
You can prepare the pastry shell a day ahead and store it in an airtight container. The lemon curd can also be prepared ahead and refrigerated until needed.
Serving Ideas
Lemon Curd Tart is delicious served on its own, but a spoonful of lightly whipped cream makes a lovely addition. Fresh raspberries, strawberries, blueberries, or blackberries also pair beautifully with the tart lemon flavor.
For an elegant dessert, serve each slice with a small dusting of powdered sugar and a few fresh berries. The crisp pastry, creamy curd, and bright citrus flavor create a beautifully balanced dessert that feels both classic and refreshing.
Whether you’re making it for a celebration or simply craving something sweet and citrusy, this Lemon Curd Tart is a wonderful homemade treat. Its golden crust and glossy lemon filling make it as beautiful as it is delicious.