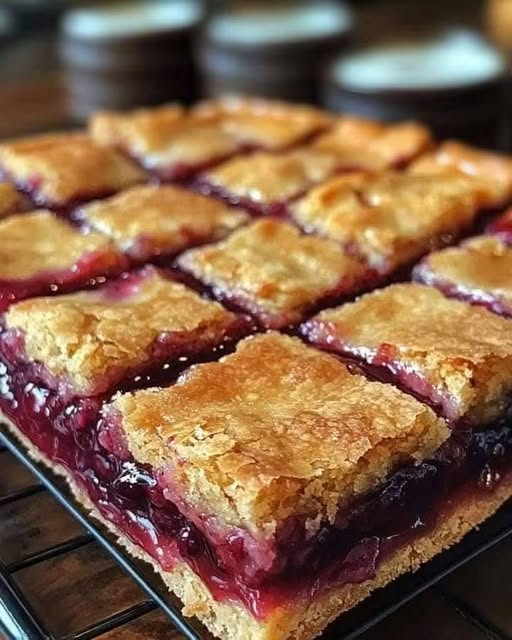
If you love classic cherry pie but want something easier to make and serve, cherry pie bars are the perfect dessert. They combine a buttery, soft cookie-like crust with a sweet-tart cherry filling and a light vanilla glaze. These bars are ideal for family gatherings, potlucks, holidays, or whenever you’re craving a homemade treat without the effort of rolling out a traditional pie crust.
Ingredients
For the crust and topping
- 1 cup (226 g) unsalted butter, softened
- 1½ cups granulated sugar
- 4 large eggs
- 1 teaspoon vanilla extract
- 3 cups all-purpose flour
- 1 teaspoon baking powder
- ½ teaspoon salt
For the filling
- 2 cans (21 ounces each) cherry pie filling
For the glaze
- 1 cup powdered sugar
- 2–3 tablespoons milk
- ½ teaspoon vanilla extract
Instructions
- Preheat your oven to 350°F (175°C). Grease a 15 x 10-inch jelly roll pan or line it with parchment paper for easy removal.
- In a large mixing bowl, beat the softened butter and granulated sugar together until the mixture is light and fluffy, about 3 to 4 minutes.
- Add the eggs one at a time, beating well after each addition. Stir in the vanilla extract.
- In another bowl, whisk together the flour, baking powder, and salt.
- Gradually add the dry ingredients to the butter mixture, mixing until a soft dough forms. Avoid overmixing to keep the bars tender.
- Spread about three-quarters of the dough evenly into the prepared baking pan. An offset spatula or lightly greased hands can make this step easier.
- Spoon the cherry pie filling evenly over the dough, spreading it gently to cover the surface.
- Drop the remaining dough by spoonfuls over the cherry filling. It doesn’t need to completely cover the filling; leaving some cherries visible creates a beautiful finished appearance.
- Bake for 35 to 40 minutes, or until the top is lightly golden and the edges are set.
- Remove the pan from the oven and allow the bars to cool completely before adding the glaze.
- To prepare the glaze, whisk together the powdered sugar, milk, and vanilla extract until smooth. Adjust the consistency by adding a little more milk if needed.
- Drizzle the glaze over the cooled bars using a spoon or piping bag. Allow the glaze to set for about 15 minutes before slicing into squares.
Tips for Success
- Use room-temperature butter and eggs for a smoother batter.
- Do not overbake the bars, as they continue to set while cooling.
- Chill the bars for 30 minutes before cutting if you want especially clean slices.
- A parchment-lined pan makes removing the bars much easier.
Variations
- Replace the cherry filling with blueberry, apple, raspberry, or peach pie filling for a different flavor.
- Add ½ teaspoon almond extract to the batter for a flavor that pairs wonderfully with cherries.
- Sprinkle sliced almonds over the top before baking for extra crunch.
- Mix a little lemon zest into the glaze for a fresh citrus note.
Storage
Store cherry pie bars in an airtight container at room temperature for up to 2 days. For longer storage, refrigerate them for up to 5 days. They can also be frozen for up to 3 months. Wrap individual bars tightly in plastic wrap and place them in a freezer-safe container. Thaw overnight in the refrigerator before serving.
Serving Suggestions
These bars are delicious on their own, but they’re even better served slightly warm with a scoop of vanilla ice cream or a dollop of freshly whipped cream. They also pair beautifully with coffee, tea, or cold milk. Their portable nature makes them an excellent dessert for picnics, bake sales, and holiday cookie trays.
Why You’ll Love This Recipe
Cherry pie bars offer all the comforting flavors of traditional cherry pie in a simple, crowd-friendly dessert. The buttery base is soft yet sturdy enough to hold the luscious cherry filling, while the sweet vanilla glaze adds the perfect finishing touch. Because they’re baked in a single pan and sliced into squares, they’re much easier to prepare and serve than a classic pie. Whether you’re baking for a celebration or simply satisfying a sweet craving, these cherry pie bars are sure to become a favorite recipe you’ll make again and again.