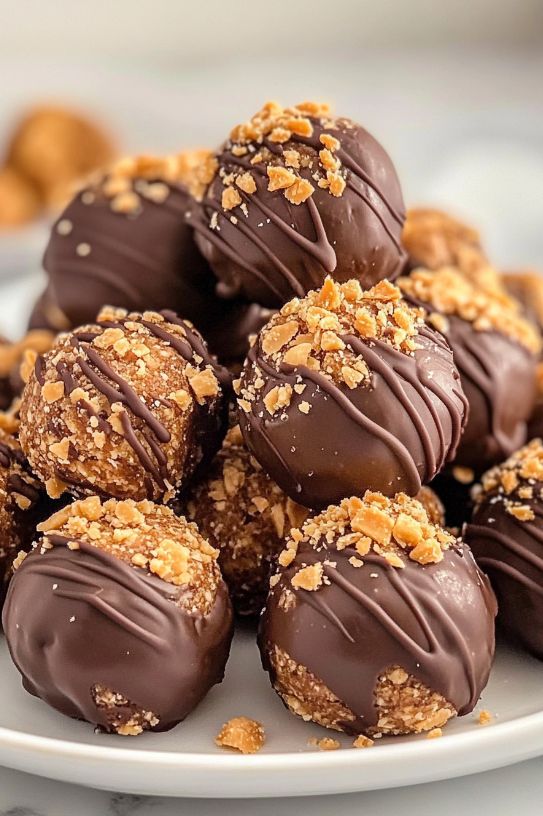
Butterfinger Balls are a delicious and easy no-bake dessert that combines the classic flavors of peanut butter, crunchy Butterfinger candy, powdered sugar, and smooth chocolate. These bite-sized treats are rich, creamy, and packed with a satisfying crunch in every bite. They are perfect for holiday parties, dessert tables, cookie exchanges, family gatherings, or simply when you want a sweet homemade treat without spending hours in the kitchen.
The best part about Butterfinger Balls is how simple they are to make. With a handful of ingredients and no oven required, this recipe is ideal for beginners and experienced bakers alike. The creamy peanut butter filling is mixed with crushed Butterfinger candy pieces, rolled into small balls, and covered with a delicious chocolate coating. The result is a homemade candy that tastes like a combination of peanut butter truffles and your favorite candy bar.
Ingredients
To make approximately 30–40 Butterfinger Balls, you will need:
- 2 cups creamy peanut butter
- ½ cup unsalted butter, softened
- 3 cups powdered sugar
- 2 cups crushed Butterfinger candy bars
- 1 teaspoon vanilla extract
- 2 cups semi-sweet chocolate chips or chocolate melting wafers
- 1 tablespoon coconut oil or shortening (optional)
- Extra crushed Butterfinger pieces for topping (optional)
Instructions
Step 1: Prepare the Peanut Butter Filling
Start by preparing the creamy filling that forms the center of the Butterfinger Balls. Place softened butter and peanut butter into a large mixing bowl. Using an electric mixer, beat the ingredients together until the mixture becomes smooth, creamy, and well combined.
Add the vanilla extract and mix again. The vanilla adds a warm sweetness that enhances the peanut butter flavor.
Slowly add the powdered sugar, about half a cup at a time, while mixing on low speed. Continue mixing until all the sugar is incorporated. The mixture should become thick and slightly firm but still easy to shape.
If the mixture seems too soft or sticky, place it in the refrigerator for 15–20 minutes. Chilling helps the filling become easier to handle and creates perfectly shaped balls.
Step 2: Add the Butterfinger Crunch
Crush the Butterfinger candy bars into small pieces. You can crush them using a food processor for a fine texture, or place the candy bars in a plastic bag and gently crush them with a rolling pin for larger crunchy pieces.
Add the crushed Butterfinger pieces to the peanut butter mixture. Use a spoon or spatula to gently fold them in until the candy pieces are evenly spread throughout the filling.
The crushed candy adds the signature Butterfinger flavor and gives the dessert a wonderful crunchy texture that balances the creamy peanut butter center.
Step 3: Roll the Mixture into Balls
Prepare a baking sheet by lining it with parchment paper or wax paper. This prevents the Butterfinger Balls from sticking while they chill.
Using a small cookie scoop or tablespoon, scoop out portions of the mixture. Roll each portion between your hands until it forms a smooth, round ball.
Place each ball onto the prepared baking sheet. Try to make the balls similar in size so they chill and coat evenly.
Once all the mixture has been shaped, place the tray in the refrigerator for at least 30 minutes. Chilling is an important step because firm centers are easier to dip in chocolate and will hold their shape better.
Step 4: Coat the Butterfinger Balls with Chocolate
While the balls are chilling, prepare the chocolate coating. Place chocolate chips or melting wafers in a microwave-safe bowl. Heat in 20–30 second intervals, stirring after each interval, until the chocolate is completely melted and smooth.
For a smoother coating that is easier to dip, add a tablespoon of coconut oil or shortening. This creates a glossy chocolate shell and helps the coating spread evenly.
Remove the chilled Butterfinger Balls from the refrigerator. Using a fork, toothpick, or dipping tool, carefully dip each ball into the melted chocolate. Turn it gently until it is fully covered.
Allow any extra chocolate to drip off, then place the coated ball back onto the parchment paper.
If desired, sprinkle a small amount of crushed Butterfinger candy on top before the chocolate hardens. This adds extra decoration and a stronger candy flavor.
Step 5: Chill Until Set
Place the chocolate-covered Butterfinger Balls back into the refrigerator for 20–30 minutes, or until the coating becomes firm.
Once the chocolate has set, the treats are ready to enjoy. They can be served immediately or stored for later.
Helpful Tips for the Best Butterfinger Balls
Use creamy peanut butter for the smoothest filling. Natural peanut butter can separate and may create a softer mixture that is harder to roll.
Make sure your butter is softened at room temperature. Cold butter will not blend properly, while melted butter can make the mixture too loose.
If your hands become sticky while rolling the balls, lightly dust them with powdered sugar or chill the mixture again before continuing.
For a different flavor, experiment with different chocolate coatings. Milk chocolate creates a sweeter candy-like taste, dark chocolate adds a richer flavor, and white chocolate gives a fun contrast to the peanut butter filling.
You can also add a pinch of salt to balance the sweetness and make the peanut butter flavor stand out even more.
Storage Instructions
Store Butterfinger Balls in an airtight container in the refrigerator for up to one week. They are best enjoyed chilled because the cold temperature keeps the filling firm and the chocolate coating crisp.
For longer storage, freeze the Butterfinger Balls in a freezer-safe container for up to three months. Place parchment paper between layers to prevent them from sticking together.
When ready to serve, allow frozen Butterfinger Balls to thaw in the refrigerator before eating.
Conclusion
Butterfinger Balls are a simple, delicious, and crowd-pleasing dessert that combines everything people love about candy and homemade treats. The creamy peanut butter center, crunchy Butterfinger pieces, and rich chocolate coating create a perfect balance of flavors and textures.
Whether you prepare them for a holiday celebration, give them as homemade gifts, or enjoy them as an everyday sweet snack, these no-bake treats are guaranteed to be a favorite. With minimal effort and maximum flavor, Butterfinger Balls are a recipe you will want to make again and again.