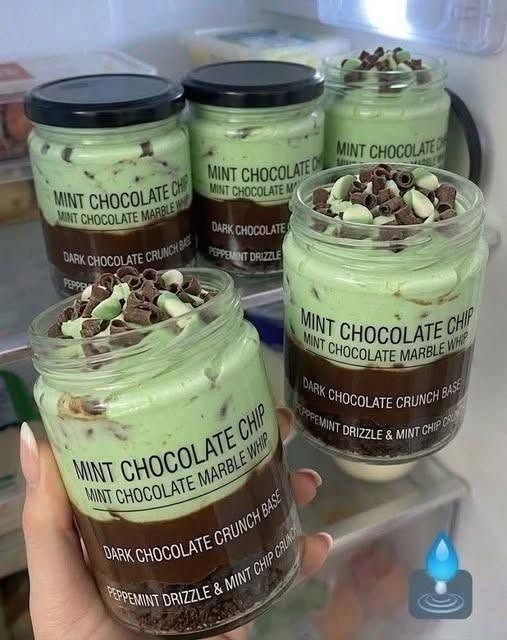
Mint Chocolate Chip Dessert Cups
Introduction
Mint chocolate chip is a classic combination loved for its refreshing mint flavor and rich chocolate crunch. These Mint Chocolate Chip Dessert Cups turn that familiar flavor into an easy individual dessert that looks impressive without requiring complicated baking. Each cup has a buttery chocolate-cookie crust, a smooth and creamy mint filling, and plenty of miniature chocolate chips throughout.
These dessert cups are perfect for parties, holidays, family gatherings, potlucks, or whenever you want a simple make-ahead treat. Because they are served individually, there is no need to slice a cake or cheesecake. You can prepare them several hours in advance, chill them until firm, and add the toppings just before serving.
The recipe is also flexible. You can make the mint flavor subtle or stronger, use green food coloring for a traditional appearance, or leave the coloring out for a more natural look. A little whipped cream and extra chocolate on top completes the dessert beautifully.
Ingredients
For the Chocolate Cookie Crust
- 24 chocolate sandwich cookies
- 4 tablespoons unsalted butter, melted
- 1 tablespoon granulated sugar, optional
For the Mint Filling
- 8 ounces cream cheese, softened
- 1/2 cup powdered sugar
- 1 teaspoon vanilla extract
- 1/2 teaspoon peppermint extract
- 1 cup heavy whipping cream, cold
- 1/3 cup miniature semisweet chocolate chips
- 2–3 drops green food coloring, optional
- Pinch of salt
For the Topping
- 1 cup whipped cream
- 2 tablespoons miniature chocolate chips
- Chocolate shavings, optional
- Small fresh mint leaves, optional
Equipment
- Food processor or rolling pin
- Mixing bowls
- Electric mixer
- Small dessert cups, glasses, or jars
- Spoon or small spatula
- Refrigerator
Step 1: Prepare the Cookie Crust
Place the chocolate sandwich cookies in a food processor and pulse until they become fine crumbs. If you do not have a food processor, place the cookies in a sealed plastic bag and crush them with a rolling pin.
Transfer the crumbs to a bowl and add the melted butter. Stir until all the crumbs are evenly coated and the mixture resembles damp sand. Add the granulated sugar if you prefer a slightly sweeter crust.
Divide the mixture evenly among 8 small dessert cups. Use the back of a spoon to gently press the crumbs into an even layer. The crust does not need to be extremely firm because it will be eaten directly from the cups.
Place the cups in the refrigerator while you prepare the filling.
Step 2: Make the Mint Cream Filling
Place the softened cream cheese in a large mixing bowl. Beat it with an electric mixer until completely smooth and creamy. Scrape down the sides of the bowl as needed.
Add the powdered sugar, vanilla extract, peppermint extract, and a small pinch of salt. Beat again until the mixture is smooth and well combined.
Be careful with the peppermint extract. It has a very concentrated flavor, so a small amount can provide plenty of mint flavor. If you prefer a milder dessert, start with less and add a little more after tasting.
Add the green food coloring, if using, and mix until the color is evenly distributed.
Step 3: Whip the Cream
Pour the cold heavy whipping cream into a separate bowl. Beat on medium-high speed until stiff peaks form. The whipped cream should hold its shape when the beaters are lifted.
Avoid overbeating because the cream can become grainy and eventually turn into butter.
Gently fold approximately one-third of the whipped cream into the cream cheese mixture. Once incorporated, fold in the remaining whipped cream in two additions.
Folding rather than vigorously stirring keeps the filling light, fluffy, and mousse-like.
Step 4: Add the Chocolate Chips
Fold the miniature chocolate chips into the mint filling. Miniature chips work particularly well because they distribute evenly throughout the creamy mixture and provide a small chocolate crunch in every bite.
Reserve a tablespoon or two of the chocolate chips for decorating the finished dessert cups.
Taste the filling before assembling the cups. If you want a stronger mint flavor, add a tiny amount of peppermint extract and mix gently.
Step 5: Assemble the Dessert Cups
Remove the chilled cookie crusts from the refrigerator.
Spoon the mint chocolate chip filling evenly into each cup. You can use a piping bag fitted with a large round tip if you want a cleaner, more decorative presentation.
Fill each cup nearly to the top, leaving a little space for the whipped cream and decorations.
Smooth the tops with a spoon or small spatula.
Cover the cups loosely with plastic wrap or place them in an airtight container. Refrigerate for at least 2 hours, or until the filling is chilled and slightly firm.
For the best texture, you can refrigerate them overnight.
Step 6: Decorate and Serve
Just before serving, add a small swirl or spoonful of whipped cream to each dessert cup.
Sprinkle the reserved miniature chocolate chips over the top. For an extra-special presentation, add a few chocolate shavings and a tiny fresh mint leaf.
Serve the dessert cups cold.
The combination of the crisp chocolate crust, creamy mint filling, and little bursts of chocolate makes every spoonful delicious. The cool mint flavor also makes these treats feel lighter than many rich chocolate desserts.
Helpful Tips
Use softened cream cheese. Room-temperature cream cheese blends much more easily and produces a smoother filling. Cold cream cheese can leave small lumps.
Keep the whipping cream cold. Cold cream whips faster and holds its structure better.
Do not overdo the peppermint. Peppermint extract is powerful. It is much easier to add a little more than to fix a filling that tastes overwhelmingly minty.
Use miniature chocolate chips. Regular-size chips can be a little bulky in individual dessert cups. Mini chips provide a more balanced texture.
Chill thoroughly. Giving the dessert enough refrigerator time allows the filling to firm up and makes the cups easier and more enjoyable to eat.
Variations
For an even richer dessert, replace some of the chocolate cookie crumbs with finely chopped chocolate wafer cookies.
You can also make a white-chocolate version by folding finely chopped white chocolate into the mint filling. The creamy white chocolate pairs especially well with peppermint.
For a festive holiday presentation, use green-tinted filling and decorate each cup with chocolate curls and a small mint leaf. You could also add crushed peppermint candies to the topping for a seasonal crunch.
If you prefer a more natural appearance, simply leave out the food coloring. The dessert will have a pale cream color while still delivering plenty of mint and chocolate flavor.
For a lighter version, you can substitute part of the cream cheese with Greek yogurt, although the finished texture will be slightly less rich and firm.
Make-Ahead Instructions
These dessert cups are excellent for entertaining because they can be prepared ahead of time. Assemble the crust and filling, cover the cups, and refrigerate them for up to 24 hours.
For the freshest presentation, wait to add whipped cream, chocolate shavings, and mint leaves until shortly before serving.
Storage
Store leftover dessert cups covered in the refrigerator. They are best enjoyed within 3 days for the freshest texture and flavor.
Do not leave them at room temperature for extended periods because the cream-based filling needs to remain chilled.