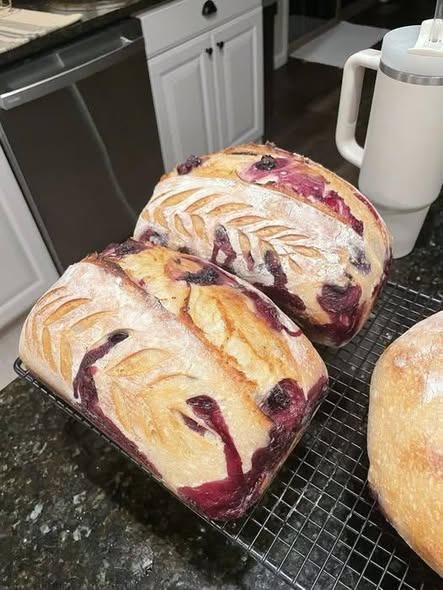
This beautiful berry sourdough bread is the perfect combination of a crisp, golden crust, a soft and chewy interior, and bursts of sweet-tart berries throughout every slice. Inspired by the loaves shown in the photo, this recipe creates rustic artisan-style bread with a naturally fermented sourdough flavor and gorgeous berry streaks.
The dough is made with a healthy sourdough starter, flour, water, and salt, while fresh or frozen berries add color, flavor, and a slightly jammy texture. A touch of honey or maple syrup balances the natural tartness of the berries. The result is a loaf that looks impressive but is surprisingly manageable to make at home.
Ingredients
For the sourdough dough
- 100 g active sourdough starter
- 350 g bread flour
- 150 g all-purpose flour
- 350 g water
- 25 g honey or maple syrup
- 10 g fine sea salt
- 150–180 g fresh or frozen blueberries, raspberries, blackberries, or a combination
- 1 teaspoon lemon zest, optional
- Rice flour or bread flour for dusting
For the best results, use an active starter that has recently been fed and is bubbly, expanded, and able to pass the float test. If using frozen berries, do not thaw them completely before adding them to the dough. Keeping them cold helps prevent excessive bleeding into the dough.
Step 1: Prepare the Starter
Feed your sourdough starter several hours before beginning. It should become bubbly and nearly double in size.
For an overnight loaf, prepare your dough in the afternoon or evening. This allows plenty of time for fermentation before shaping and baking.
Step 2: Mix the Dough
Place the water and active sourdough starter in a large mixing bowl. Stir until the starter is mostly dissolved.
Add the bread flour and all-purpose flour. Mix with your hand, wooden spoon, or dough whisk until no dry patches remain. The dough will look rough and sticky at this stage.
Cover the bowl and let the dough rest for approximately 30 minutes. This resting period, known as an autolyse or fermentation rest, gives the flour time to absorb the water and helps develop gluten.
After resting, add the honey and salt. Work them into the dough using wet hands. Pinch, fold, and squeeze the dough until everything is evenly incorporated.
Step 3: Begin Stretching and Folding
Cover the bowl and allow the dough to rest for another 30 minutes.
Perform a series of stretch-and-folds every 30 minutes for the next 2 hours. To do this, grab one side of the dough, gently stretch it upward, and fold it over the center. Turn the bowl and repeat on all four sides.
As the folds continue, the dough should become smoother, stronger, and more elastic.
Avoid aggressively kneading the dough because the delicate berries will eventually be folded into it, and excessive handling can make the finished loaf dense.
Step 4: Add the Berries
After the dough has developed some strength, gently incorporate the berries.
Place the dough on a lightly dampened work surface and carefully stretch it into a rough rectangle. Scatter the berries evenly over the surface. If desired, sprinkle the lemon zest over the berries.
Fold the dough in half, then fold it again. Gently tuck and roll it until the berries are distributed.
Some berries may break during this process, creating beautiful purple and red streaks throughout the dough. That’s completely fine and adds to the rustic appearance.
If you want clearly defined berries, handle the dough more gently and use chilled berries.
Step 5: Bulk Fermentation
Return the dough to the bowl and cover it.
Let it ferment at room temperature for approximately 4–6 hours, depending on the temperature of your kitchen and the strength of your starter.
Rather than relying only on the clock, look for visual signs. The dough should become noticeably puffy, smoother, and slightly domed. It may increase in volume by approximately 50–75 percent rather than necessarily doubling.
A warmer kitchen will speed fermentation, while a cooler kitchen will require more time.
Step 6: Shape the Loaf
Lightly flour your work surface and gently turn the fermented dough out.
Shape it into a round boule or an oval batard. Try to create surface tension without squeezing the berries.
For a boule, fold the outer edges toward the center, then turn the dough over and gently drag it toward you across the counter to tighten the surface.
Place the shaped loaf seam-side up in a generously floured banneton or bowl lined with a floured kitchen towel.
Step 7: Cold Proof
Cover the shaped loaf and place it in the refrigerator for 8–14 hours.
Cold fermentation develops deeper sourdough flavor and makes the dough easier to score and handle.
The next day, preheat your oven to 475°F (245°C) with a Dutch oven inside. Allow the Dutch oven to heat for at least 30–45 minutes.
Step 8: Score and Bake
Carefully turn the chilled dough onto a sheet of parchment paper.
Dust the surface lightly with flour. Using a bread lame or very sharp knife, score a deep slash across the top. You can also create decorative wheat, leaf, or branch patterns like those visible on the loaves in the photo.
Transfer the dough into the hot Dutch oven.
Cover and bake for 20 minutes. Remove the lid, reduce the oven temperature to 450°F (230°C), and continue baking for another 20–25 minutes.
The bread should have a deeply golden crust. If the berries cause dark spots on the crust, don’t worry—this is normal.
Step 9: Cool Completely
Remove the bread from the Dutch oven and place it on a wire rack.
Allow it to cool for at least 1–2 hours before slicing. Although waiting can be difficult, cutting sourdough too early can make the interior gummy because the crumb is still setting.
Once cooled, slice the loaf with a serrated bread knife.
Serving Suggestions
This berry sourdough is delicious on its own, but it becomes especially wonderful when lightly toasted and spread with butter or cream cheese. For a sweeter breakfast, serve slices with honey, fruit preserves, or a dusting of powdered sugar.
It also makes a beautiful base for French toast. The chewy crumb absorbs the custard while the berries provide little pockets of fruity flavor.
For a savory-sweet combination, pair toasted slices with soft goat cheese, ricotta, or mascarpone.
Tips for Success
Use berries that are firm rather than overly ripe and watery. Excess moisture can make the dough difficult to handle.
If using frozen berries, add them directly from the freezer. Cold berries are less likely to completely crush during mixing.
Don’t add all the berries at once if the dough feels weak. Add them gradually during folding.
Most importantly, watch the dough rather than the clock. Sourdough fermentation depends heavily on room temperature, starter strength, flour, and hydration.
For a dramatic appearance, use a mixture of blueberries, raspberries, and blackberries. Blueberries create purple streaks, raspberries add vibrant red accents, and blackberries produce deep violet patches.
Storage
Once completely cooled, store the bread at room temperature in a paper or bread bag for up to 3 days. Avoid sealing it in an airtight plastic bag while the crust is still crisp, as trapped moisture will soften it.
For longer storage, slice the cooled loaf and freeze the slices in a freezer-safe bag. Individual slices can be toasted directly from frozen.
This gorgeous berry sourdough bread is as enjoyable to make as it is to eat. With its crackly artisan crust, tender crumb, colorful berry pockets, and naturally fermented flavor, it makes an impressive breakfast, brunch centerpiece, or homemade gift.