Sourdough Focaccia is a beautiful combination of traditional Italian flatbread and naturally fermented sourdough. Known for its airy texture, crisp golden edges, and signature dimples filled with fragrant olive oil, focaccia is one of the most satisfying breads to bake at home. The sourdough starter adds depth of flavor, subtle tanginess, and an incredible texture that makes this bread truly unforgettable.
This rustic bread is perfect as a side dish, appetizer, sandwich bread, or snack. Topped with olive oil, fresh herbs, and flaky sea salt, it delivers bakery-quality results with surprisingly simple ingredients. Whether you’re an experienced sourdough baker or just beginning your sourdough journey, this recipe will guide you through creating a delicious, flavorful focaccia with a light and airy crumb.
Why You’ll Love This Recipe
- Naturally fermented with sourdough starter
- Crispy golden crust and soft interior
- Rich olive oil flavor
- Easy-to-customize toppings
- Perfect for sandwiches and dipping
- Great way to use active sourdough starter
- Bakery-style results at home
Ingredients
For the Dough
- 500 grams bread flour
- 375 grams water, room temperature
- 100 grams active sourdough starter
- 10 grams fine sea salt
- 20 grams extra virgin olive oil
For the Topping
- 3 tablespoons extra virgin olive oil
- 1 tablespoon fresh rosemary, chopped
- 1 tablespoon fresh thyme leaves
- 1 teaspoon flaky sea salt
- Freshly ground black pepper, to taste
Equipment Needed
- Large mixing bowl
- 9×13-inch baking pan
- Bench scraper
- Kitchen scale
- Plastic wrap or kitchen towel
- Cooling rack
Step 1: Prepare the Dough
In a large mixing bowl, combine the water and active sourdough starter. Stir until the starter is mostly dissolved.
Add the bread flour and mix until no dry flour remains. The dough will look shaggy and sticky.
Cover the bowl and allow it to rest for 30 minutes. This rest period, known as autolyse, helps hydrate the flour and begins gluten development naturally.
After 30 minutes, add the salt and olive oil.
Mix thoroughly by folding and squeezing the dough until everything is fully incorporated.
The dough will feel sticky, but resist the temptation to add extra flour.
Step 2: Stretch and Fold
To strengthen the dough, perform a series of stretch-and-fold sessions.
With wet hands, grab one side of the dough, stretch it upward, and fold it over itself.
Rotate the bowl and repeat on all four sides.
Cover and rest for 30 minutes.
Repeat this process 3 to 4 times over the next 2 hours.
With each fold, the dough will become smoother, stronger, and more elastic.
Step 3: Bulk Fermentation
After the final stretch and fold, cover the bowl and let the dough ferment at room temperature for 4 to 6 hours.
The exact timing depends on your room temperature and the strength of your starter.
The dough is ready when it appears puffy, has increased in volume by about 50%, and shows bubbles throughout.
Avoid waiting until it doubles completely, as over-fermentation can weaken the structure.
Step 4: Prepare the Baking Pan
Generously coat a 9×13-inch baking pan with olive oil.
The oil helps create the classic crispy bottom crust that makes focaccia so delicious.
Carefully transfer the dough into the prepared pan.
Turn it gently so all sides become coated with oil.
Cover the pan with plastic wrap or a damp towel.
Allow the dough to rest for 30 minutes.
Step 5: Stretch the Dough
After resting, gently stretch the dough toward the edges of the pan.
Do not force it if it resists.
Cover and let it rest another 20 minutes, then stretch again if necessary.
Eventually, the dough will naturally fill the pan.
Step 6: Cold Proof (Optional but Recommended)
For deeper flavor, place the covered pan in the refrigerator overnight for 12 to 18 hours.
This slow fermentation develops a more complex taste and improves texture.
If you prefer, you can proceed directly to the final proof after stretching.
Step 7: Final Proof
Remove the dough from the refrigerator if using a cold proof.
Allow it to sit at room temperature for about 2 hours until noticeably puffy.
The dough should have visible air bubbles and feel soft and airy.
Step 8: Create the Signature Dimples
Preheat your oven to 425°F (220°C).
Drizzle the surface of the dough generously with olive oil.
Lightly oil your fingertips.
Press your fingers deep into the dough to create the characteristic focaccia dimples.
Press all over the surface without deflating the dough completely.
The dimples will hold pools of olive oil and create the bread’s distinctive appearance.
Step 9: Add the Toppings
Sprinkle the surface evenly with:
- Chopped rosemary
- Thyme leaves
- Flaky sea salt
- Freshly ground black pepper
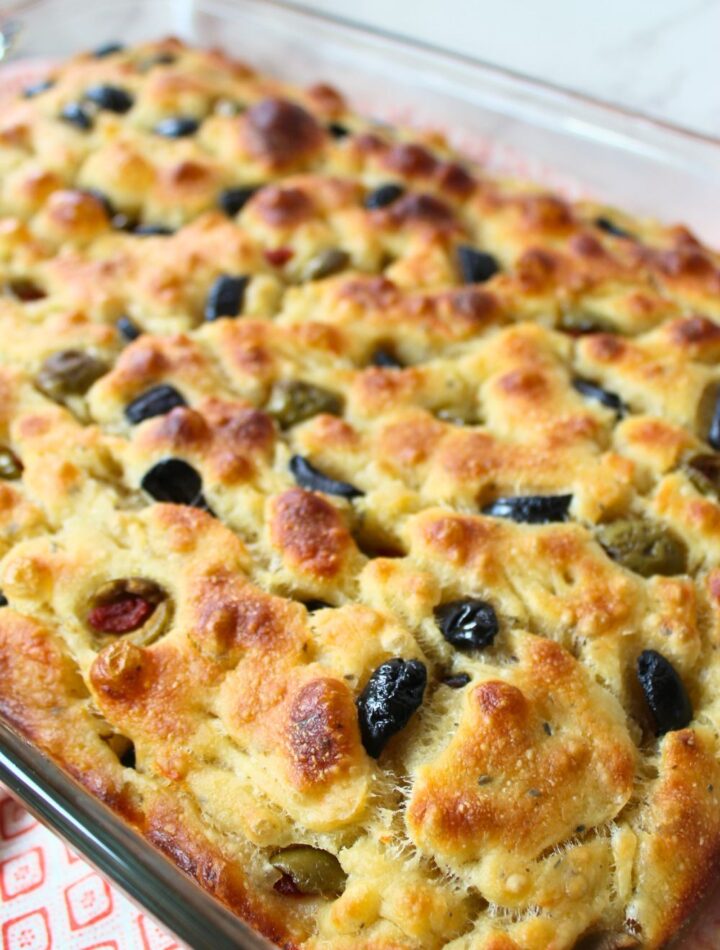
You may also add sliced olives, roasted garlic, cherry tomatoes, or caramelized onions if desired.
Step 10: Bake
Place the pan in the preheated oven.
Bake for 25 to 30 minutes, or until the top is deep golden brown and the edges are crisp.
The bread should sound slightly hollow when tapped.
The internal temperature should reach approximately 200°F (93°C).
Step 11: Cool
Remove the focaccia from the oven.
Allow it to cool in the pan for about 10 minutes.
Transfer to a cooling rack and let cool slightly before slicing.
The aroma of olive oil and herbs will fill your kitchen as the bread cools.
Serving Suggestions
This sourdough focaccia is incredibly versatile and can be served with:
- Olive oil and balsamic vinegar
- Soups and stews
- Pasta dishes
- Charcuterie boards
- Grilled meats
- Fresh salads
- Sandwiches and paninis
It is equally delicious served warm or at room temperature.
Storage Instructions
Store focaccia in an airtight container or bread bag at room temperature for up to 3 days.
For longer storage, freeze slices individually and thaw as needed.
Tips for Success
- Use a strong, active sourdough starter.
- Don’t skimp on the olive oil.
- Handle the dough gently to preserve air bubbles.
- Cold-proof overnight for maximum flavor.
- Use fresh herbs whenever possible.
- Allow the bread to cool slightly before slicing.