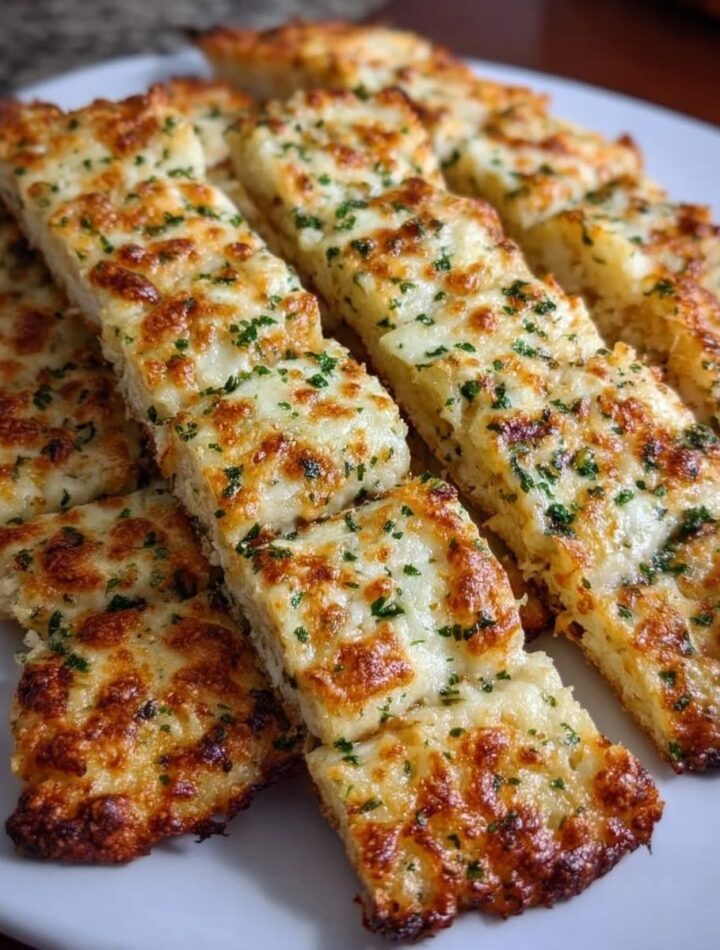
If you’re following a low-carb or ketogenic lifestyle but still crave warm, cheesy breadsticks, these Keto Cauliflower Garlic Breadsticks are the perfect solution. Made with cauliflower instead of traditional flour, they offer a deliciously cheesy, garlicky flavor with a satisfying texture that pairs well with soups, salads, pasta alternatives, or your favorite dipping sauce. They are naturally gluten-free, packed with vegetables, and easy to customize with herbs and seasonings. While they won’t taste exactly like traditional bread, they deliver a comforting, savory bite that’s perfect for satisfying bread cravings without the extra carbohydrates.
Ingredients
For the Breadstick Base
- 1 medium head cauliflower (about 4 cups riced)
- 1 large egg
- 1½ cups shredded mozzarella cheese, divided
- ¼ cup grated Parmesan cheese
- 2 tablespoons cream cheese, softened
- 1 teaspoon garlic powder
- ½ teaspoon onion powder
- 1 teaspoon Italian seasoning
- ½ teaspoon salt
- ¼ teaspoon black pepper
For the Garlic Butter Topping
- 2 tablespoons butter, melted
- 2 cloves garlic, finely minced
- 1 tablespoon chopped fresh parsley
- 2 tablespoons grated Parmesan cheese
Optional for Serving
- Sugar-free marinara sauce
- Ranch dressing
- Garlic aioli
Instructions
Step 1: Prepare the Cauliflower
Preheat your oven to 425°F (220°C). Line a large baking sheet or pizza pan with parchment paper.
Wash the cauliflower thoroughly and remove the leaves and thick stem. Cut the florets into small pieces and pulse them in a food processor until they resemble rice. If you don’t have a food processor, use the coarse side of a box grater.
Transfer the riced cauliflower to a microwave-safe bowl and microwave for 5–6 minutes until tender. Alternatively, steam it until soft.
Allow the cooked cauliflower to cool for about 10 minutes. Once cool enough to handle, place it in a clean kitchen towel or cheesecloth and squeeze out as much moisture as possible. This is the most important step for achieving breadsticks that are firm instead of soft. Remove as much liquid as you can.
Step 2: Make the Dough
Place the drained cauliflower into a large mixing bowl. Add the egg, 1 cup mozzarella cheese, cream cheese, Parmesan cheese, garlic powder, onion powder, Italian seasoning, salt, and black pepper.
Mix thoroughly until all ingredients are evenly combined. The mixture should hold together when pressed with your hands.
Step 3: Shape the Breadsticks
Transfer the mixture onto the prepared baking sheet.
Using clean hands or a spatula, press it into a rectangle about 10 x 8 inches and approximately ½ inch thick. Smooth the edges so they bake evenly.
Bake for 20–25 minutes until the crust becomes lightly golden and feels firm when touched.
Step 4: Add the Cheese
Remove the pan from the oven.
Sprinkle the remaining ½ cup mozzarella evenly across the top.
Return to the oven and bake for another 8–10 minutes until the cheese has melted completely and begins turning golden brown.
If you like extra color, broil for 1–2 minutes while watching carefully to avoid burning.
Step 5: Prepare the Garlic Butter
While the breadsticks finish baking, combine the melted butter, minced garlic, parsley, and grated Parmesan in a small bowl.
As soon as the breadsticks come out of the oven, brush the garlic butter generously over the hot cheesy surface. The warmth helps the butter soak in while keeping the topping flavorful and aromatic.
Step 6: Slice and Serve
Allow the breadsticks to cool for 5 minutes before cutting.
Using a pizza cutter or sharp knife, slice into long breadsticks or smaller appetizer-sized pieces.
Serve warm with sugar-free marinara, ranch dressing, or garlic aioli for dipping.
Tips for Success
The secret to sturdy cauliflower breadsticks is removing as much moisture as possible after cooking the cauliflower. Skipping this step can leave the finished breadsticks soft and difficult to slice.
Freshly grated mozzarella melts more smoothly than pre-shredded cheese, which often contains anti-caking agents. If possible, grate your own cheese for the best texture.
Allow the breadsticks to cool briefly before cutting. They continue to firm up as they rest, making them easier to slice without falling apart.
For crispier edges, bake on a preheated pizza stone or use a perforated pizza pan to encourage better airflow.
Flavor Variations
Customize these breadsticks with your favorite keto-friendly ingredients. Add chopped cooked bacon, sliced jalapeños, red pepper flakes, fresh rosemary, thyme, or oregano for extra flavor. A blend of mozzarella, provolone, and cheddar creates a richer cheese topping, while a sprinkle of everything bagel seasoning adds a savory twist.
For a spicy version, mix cayenne pepper into the dough or drizzle the finished breadsticks with hot sauce. You can also fold chopped spinach or finely diced roasted peppers into the cauliflower mixture for added color and nutrition.
Storage
Store leftovers in an airtight container in the refrigerator for up to four days.
Reheat in a 375°F (190°C) oven or air fryer for 5–8 minutes until heated through and crisp around the edges. Avoid microwaving if possible, as it can soften the texture.
To freeze, cool the breadsticks completely, wrap individual portions in plastic wrap, and place them in a freezer-safe container or bag. Freeze for up to two months. Reheat directly from frozen in the oven until hot and crispy.
Nutrition Highlights
These cauliflower garlic breadsticks are naturally low in carbohydrates and high in healthy fats and protein from the cheese and egg, making them suitable for many ketogenic meal plans. They also provide fiber, vitamins, and minerals from the cauliflower while remaining gluten-free. Exact nutritional values will vary depending on ingredient brands and serving size.
Whether you’re preparing them as a snack, appetizer, or side dish, these Keto Cauliflower Garlic Breadsticks are flavorful, satisfying, and simple to make. Their cheesy topping, buttery garlic finish, and crisp edges make them a favorite for anyone looking for a delicious low-carb alternative to traditional breadsticks.