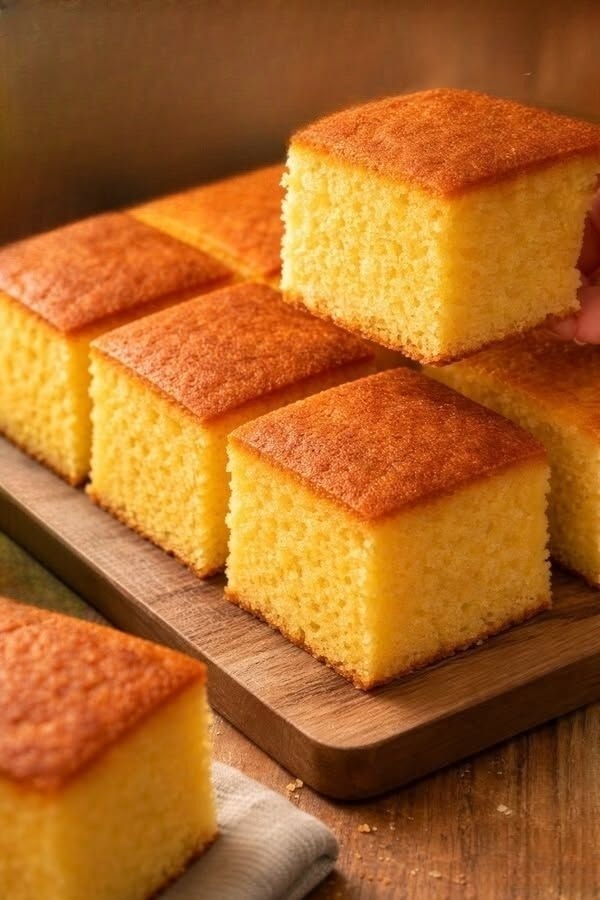
This classic golden sponge cake is soft, fluffy, buttery, and beautifully golden on top. The simple square slices shown in the picture make this cake perfect for afternoon tea, family gatherings, lunchboxes, birthdays, or whenever you want an easy homemade dessert. It has a tender crumb, lightly crisp golden edges, and a rich vanilla flavor without requiring complicated ingredients.
Ingredients
For the Cake
- 2 cups all-purpose flour
- 2 teaspoons baking powder
- ¼ teaspoon salt
- 1 cup unsalted butter, softened
- 1 ¼ cups granulated sugar
- 4 large eggs, room temperature
- 2 teaspoons pure vanilla extract
- ¾ cup whole milk, room temperature
- 2 tablespoons vegetable oil
- 2 tablespoons sour cream or plain yogurt
Optional Finishing
- Powdered sugar, for dusting
- Fresh berries, for serving
- Whipped cream, for serving
- Honey or fruit jam, for spreading
Equipment
- 9 × 9-inch square baking pan
- Mixing bowls
- Electric hand mixer or stand mixer
- Whisk
- Rubber spatula
- Parchment paper
- Cooling rack
Instructions
1. Prepare the Oven and Pan
Preheat your oven to 350°F (175°C). Grease a 9 × 9-inch square baking pan with butter or nonstick spray. Line the bottom with parchment paper, leaving a little overhang on two sides so the finished cake can be lifted out easily.
Preparing the pan properly is important because this cake is delicate while warm. A lined pan also helps keep the sides neat when you cut the cake into attractive squares.
2. Combine the Dry Ingredients
In a medium bowl, whisk together the flour, baking powder, and salt.
Whisking the dry ingredients first distributes the baking powder evenly throughout the flour. This helps the cake rise consistently and gives you a soft, even crumb.
Set the bowl aside while you prepare the butter mixture.
3. Cream the Butter and Sugar
Place the softened butter and granulated sugar in a large mixing bowl. Beat on medium-high speed for about 3–5 minutes, or until the mixture becomes pale, light, and fluffy.
This step creates tiny air bubbles in the butter. Those bubbles expand during baking and contribute to the cake’s light texture.
Avoid using cold butter because it will not cream properly. The butter should be soft enough to press easily with a finger but should not look melted.
4. Add the Eggs
Add the eggs one at a time, beating well after each addition. Scrape down the sides of the bowl as needed.
Add the vanilla extract and mix until incorporated.
If the batter looks slightly curdled after adding the eggs, don’t worry. It will come together when the dry ingredients and milk are added.
5. Add the Dry Ingredients and Milk
Reduce the mixer speed to low. Add about one-third of the flour mixture, followed by half of the milk.
Mix briefly, then add another third of the flour mixture, followed by the remaining milk. Finish with the last portion of flour.
Mix only until the ingredients are combined.
Overmixing can develop too much gluten, resulting in a dense or chewy cake rather than the soft, delicate texture you want.
6. Add the Sour Cream and Oil
Fold in the sour cream or plain yogurt and vegetable oil using a rubber spatula.
The sour cream adds moisture and tenderness, while a small amount of oil helps keep the cake soft even after it cools.
The finished batter should be thick, smooth, and creamy.
7. Fill the Pan
Pour the batter into the prepared square pan. Use a spatula to spread it evenly from corner to corner.
Gently tap the pan once or twice against the countertop to release any unusually large air pockets.
Do not overfill the pan. The batter should have enough room to rise while baking.
8. Bake
Place the pan in the center of the preheated oven and bake for approximately 35–45 minutes.
The exact baking time can vary depending on your oven and the type of pan you use.
The cake is ready when:
- The top is evenly golden brown.
- The center springs back lightly when touched.
- A toothpick inserted into the middle comes out clean or with a few moist crumbs.
- The edges begin to pull slightly away from the pan.
Try not to open the oven door during the first 25–30 minutes because a sudden temperature change can cause the cake to sink.
9. Cool the Cake
Remove the cake from the oven and place the pan on a cooling rack. Let it cool for about 10–15 minutes.
Run a thin knife around the edges if necessary, then use the parchment overhang to carefully lift the cake from the pan.
Place it directly on the rack and allow it to cool completely before slicing.
Although it can be tempting to cut the cake while warm, allowing it to cool helps the crumb finish setting and makes cleaner slices.
How to Cut Perfect Cake Squares
For neat, bakery-style squares like those shown in the picture, use a sharp serrated or chef’s knife.
Trim the edges if you want perfectly uniform pieces. Then cut the cake into equal squares.
For especially clean cuts, wipe the knife with a slightly damp cloth between slices.
You can serve the cake as large squares for dessert or smaller pieces for tea and snack time.
Serving Ideas
This golden sponge cake is delicious on its own, but there are plenty of ways to serve it.
For a simple presentation, dust the cooled cake lightly with powdered sugar.
For dessert, serve each square with whipped cream and fresh strawberries, blueberries, raspberries, or sliced peaches.
You can also drizzle individual pieces with honey or warm fruit sauce.
For a breakfast-style treat, spread a slice with butter, jam, or honey and serve alongside tea or coffee.
Another delicious option is to split the cake horizontally and fill it with whipped cream and fruit. This turns the simple sponge into an easy celebration cake.
Tips for the Best Golden Sponge Cake
Use room-temperature ingredients. Room-temperature eggs, milk, and butter combine more easily and help create a smoother batter.
Measure flour carefully. Too much flour can make the cake dry. For the most accurate result, weigh the flour if you have a kitchen scale. Otherwise, spoon it into a measuring cup and level the top instead of scooping directly from the flour container.
Don’t overmix. Once the flour is added, mix only until no large streaks remain.
Don’t overbake. A few extra minutes in the oven can turn a moist sponge cake dry. Start checking near the lower end of the suggested baking time.
Let it cool properly. Cooling allows the structure to stabilize and makes the cake easier to cut.
Storage
Store the completely cooled cake in an airtight container at room temperature for up to 3 days.
For longer storage, refrigerate it for up to 5 days, although refrigeration can make sponge cake slightly firmer. Allow refrigerated slices to sit at room temperature before serving.
You can also freeze individual cake squares. Wrap each piece tightly in plastic wrap and place the wrapped pieces in a freezer-safe container or bag. Freeze for up to 2 months.
Thaw the cake at room temperature before serving.
Variations
Lemon Sponge Cake
Add 1 tablespoon of finely grated lemon zest to the batter and replace 1 tablespoon of milk with fresh lemon juice.
Orange Sponge Cake
Add the zest of one orange for a fragrant citrus version.
Chocolate Sponge Cake
Replace ¼ cup of the flour with ¼ cup unsweetened cocoa powder. You can also add chocolate chips for extra richness.
Cinnamon Sugar Cake
Before baking, sprinkle the top lightly with a mixture of cinnamon and sugar. This creates a wonderfully aromatic golden crust.
Berry Cake
Fold a small handful of fresh or frozen berries into the batter before transferring it to the pan. If using frozen berries, don’t thaw them first.
Frequently Asked Questions
Why did my cake turn out dense?
The most common reasons are overmixing the batter, using expired baking powder, measuring too much flour, or not creaming the butter and sugar sufficiently.
Can I use a different pan?
Yes. An 8-inch square pan will produce a thicker cake and may require additional baking time. A 9 × 13-inch pan will create a thinner cake and will generally bake faster.
Can I make this cake without sour cream?
Yes. Plain full-fat yogurt is an excellent substitute. You can also use buttermilk, although the texture may be slightly different.
How do I keep the top from becoming too dark?
If the top browns too quickly while the center still needs baking, loosely cover the cake with aluminum foil for the remaining baking time.