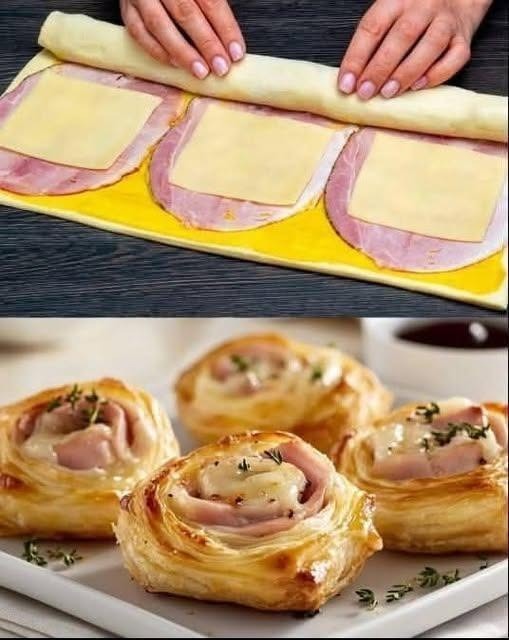
Golden, flaky, and filled with savory ham and melted cheese, these Air Fryer Ham and Cheese Puff Pastries are a quick and delicious snack, lunch, or appetizer. Using store-bought puff pastry makes preparation easy while the air fryer creates a perfectly crisp, buttery crust in minutes. Whether you’re preparing a family breakfast, party appetizer, or simple weeknight meal, these pastries are sure to impress with their rich flavor and irresistible texture.
Preparation Time
- Prep Time: 15 minutes
- Chill Time: 10 minutes (optional)
- Cook Time: 10–12 minutes
- Total Time: 35–40 minutes
Servings
Makes 8 puff pastry pockets
Ingredients
For the Puff Pastries
- 1 sheet frozen puff pastry, thawed
- 8 slices deli ham
- 1 cup shredded mozzarella cheese
- 1 cup shredded cheddar cheese
- 1 teaspoon Dijon mustard (optional)
- 1 teaspoon dried parsley
- ½ teaspoon garlic powder
- ¼ teaspoon black pepper
For the Egg Wash
- 1 large egg
- 1 tablespoon water
Optional Garnishes
- Fresh parsley, chopped
- Sesame seeds
- Everything bagel seasoning
Equipment Needed
- Air fryer
- Pastry brush
- Sharp knife or pizza cutter
- Mixing bowl
- Fork
Instructions
Step 1: Prepare the Puff Pastry
Remove the puff pastry from the freezer and allow it to thaw according to the package directions, usually about 30 to 40 minutes at room temperature.
Lightly flour a clean surface and gently unfold the pastry sheet. If needed, use a rolling pin to smooth any creases without making the pastry too thin.
Cut the puff pastry into 8 equal rectangles using a sharp knife or pizza cutter.
Step 2: Prepare the Filling
In a small bowl, combine the mozzarella cheese, cheddar cheese, parsley, garlic powder, and black pepper.
Mix until evenly combined.
If using Dijon mustard, spread a very thin layer onto half of each pastry rectangle. The mustard adds a subtle tangy flavor that pairs wonderfully with the ham and cheese.
Place one slice of ham on each rectangle and top with a generous spoonful of the cheese mixture.
Be careful not to overfill the pastries, as excess filling can leak out during cooking.
Step 3: Form the Pastry Pockets
Fold each pastry rectangle over the filling to create a pocket.
Press the edges together firmly with your fingers.
Use a fork to crimp the edges all around, sealing the filling inside.
This not only helps prevent leakage but also gives the pastries a classic bakery-style appearance.
For extra ventilation, cut a small slit on top of each pastry with a knife.
Step 4: Apply the Egg Wash
In a small bowl, whisk together the egg and water.
Brush the tops of the pastries generously with the egg wash.
The egg wash helps create a beautiful golden-brown finish and enhances the flaky texture.
If desired, sprinkle sesame seeds or everything bagel seasoning over the tops for added flavor and crunch.
Step 5: Chill the Pastries
For the flakiest results, place the assembled pastries in the refrigerator for 10 minutes before air frying.
Chilling helps the butter in the puff pastry remain cold, which creates better layers and puffing during cooking.
While optional, this step is highly recommended.
Step 6: Preheat the Air Fryer
Preheat your air fryer to 375°F (190°C) for 3 to 5 minutes.
Preheating ensures even cooking and helps the pastries rise properly.
Step 7: Air Fry the Pastries
Lightly spray the air fryer basket with cooking spray or line it with air fryer parchment paper.
Arrange the pastries in a single layer, leaving space between each one.
Depending on the size of your air fryer, you may need to cook them in batches.
Air fry at 375°F (190°C) for 10 to 12 minutes, or until the pastries are puffed and golden brown.
Check them after 8 minutes, as cooking times may vary slightly between air fryer models.
The cheese should be melted and bubbly, and the pastry should be crisp and deeply golden.
Step 8: Cool and Serve
Carefully remove the pastries from the air fryer using a spatula.
Allow them to cool for 3 to 5 minutes before serving.
The filling will be very hot immediately after cooking.
Garnish with freshly chopped parsley if desired.
Serving Suggestions
These ham and cheese puff pastries are versatile and can be served in many ways:
- Breakfast with scrambled eggs and fruit
- Lunch with a fresh green salad
- Snack with honey mustard dipping sauce
- Party appetizer platter
- Light dinner with soup
- School or work lunchbox meal
They pair especially well with tomato soup, potato soup, or a crisp garden salad.
Variations
Swiss Ham and Cheese
Replace cheddar and mozzarella with Swiss cheese for a deli-style flavor.
Spicy Version
Add sliced jalapeños or a pinch of crushed red pepper flakes to the filling.
Breakfast Pastries
Add scrambled eggs along with the ham and cheese.
Turkey and Cheese
Substitute turkey slices for ham for a lighter variation.
Italian Style
Use provolone cheese and add a sprinkle of Italian seasoning.
Storage Instructions
Store leftover pastries in an airtight container in the refrigerator for up to 3 days.
Reheating
For best results, reheat in the air fryer at 350°F (175°C) for 3 to 4 minutes.
This restores the crisp, flaky texture much better than a microwave.
Freezing
You can freeze uncooked assembled pastries for up to 2 months.
Place them on a baking sheet until frozen solid, then transfer to freezer-safe bags.
Cook directly from frozen, adding 3 to 5 extra minutes to the cooking time.
Tips for Perfect Air Fryer Puff Pastries
- Always thaw puff pastry completely before using.
- Keep the pastry cold for maximum flakiness.
- Do not overfill the pockets.
- Seal edges thoroughly to prevent cheese leakage.
- Preheat the air fryer for even cooking.
- Cook in a single layer without overcrowding.
- Allow pastries to cool slightly before eating.
Conclusion
These Air Fryer Ham and Cheese Puff Pastries combine buttery, flaky pastry with savory ham and gooey melted cheese for a delicious treat that’s easy to prepare and incredibly satisfying. The air fryer gives them a crisp golden exterior without the need for a traditional oven, making them perfect for busy days. Whether served for breakfast, lunch, dinner, or as a snack, these homemade pastries deliver bakery-quality results with minimal effort. One bite of the crispy layers and cheesy filling, and they’ll quickly become a favorite recipe in your kitchen.