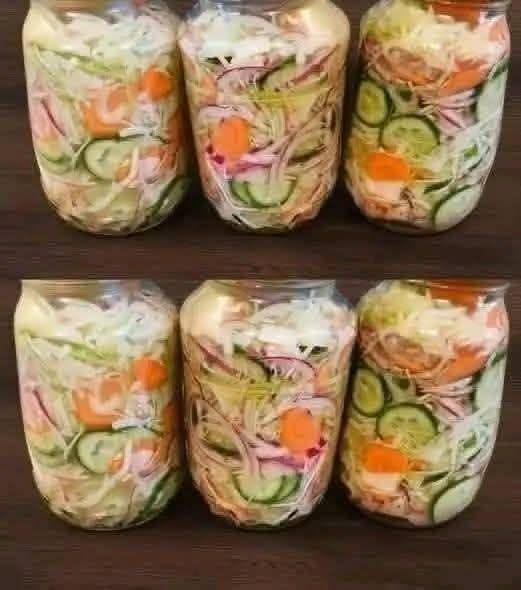
The classic Depression-Era Salad is a colorful, sweet-tangy mix of cabbage, cucumbers, onions, carrots, and peppers preserved in a lightly spiced vinegar brine. Inspired by resourceful recipes from the 1930s, this canned salad was a practical way to extend the harvest and enjoy fresh vegetables throughout the year. It makes a delicious side dish for grilled meats, sandwiches, beans, or hearty country meals.
Why You’ll Love This Recipe
- Uses inexpensive garden vegetables.
- Great way to preserve a summer harvest.
- Crisp, tangy, and slightly sweet.
- Shelf-stable when processed correctly.
- Perfect for picnics, potlucks, and everyday meals.
Ingredients
Vegetables
- 6 cups shredded green cabbage
- 3 cups sliced cucumbers
- 2 cups sliced carrots
- 2 cups thinly sliced onions
- 2 cups chopped green bell peppers
- 1 cup chopped red bell peppers
For Salting
- ¼ cup pickling salt
- Ice water
Pickling Brine
- 4 cups white vinegar (5% acidity)
- 2 cups water
- 1½ cups granulated sugar
- 2 tablespoons pickling salt
- 1 tablespoon mustard seeds
- 1 tablespoon celery seeds
- 1 teaspoon turmeric
- 1 teaspoon black peppercorns
- ½ teaspoon crushed red pepper flakes (optional)
Equipment
- 6 half-pint or 3 pint canning jars
- New lids and bands
- Large stockpot
- Water bath canner
- Jar lifter
- Funnel
- Bubble remover
- Clean towels
Step 1: Prepare the Vegetables
Wash all vegetables thoroughly.
Shred the cabbage into thin strips.
Slice cucumbers into thin rounds.
Peel and slice the carrots.
Thinly slice onions.
Dice the peppers.
Combine everything in a very large bowl.
Step 2: Salt the Vegetables
Sprinkle the vegetables with the pickling salt.
Mix thoroughly.
Cover with ice water.
Let stand for 2 hours.
This step helps draw out excess moisture, producing a crisp finished salad.
Drain well.
Rinse twice with cold water.
Drain again thoroughly.
Step 3: Prepare the Brine
In a large stainless-steel pot combine:
- Vinegar
- Water
- Sugar
- Pickling salt
- Mustard seed
- Celery seed
- Turmeric
- Peppercorns
- Red pepper flakes
Bring to a gentle boil.
Stir until sugar dissolves completely.
Reduce to a simmer.
Step 4: Heat the Vegetables
Add the drained vegetables to the hot brine.
Cook for about 5 minutes, stirring gently.
Do not overcook.
The vegetables should remain crisp.
Step 5: Prepare the Jars
Wash jars with hot soapy water.
Keep jars hot until ready to fill.
Prepare lids according to the manufacturer’s instructions.
Step 6: Fill the Jars
Using a slotted spoon, pack vegetables into hot jars.
Leave ½ inch headspace.
Ladle hot brine over vegetables.
Maintain the ½-inch headspace.
Remove air bubbles.
Adjust liquid if necessary.
Wipe rims clean.
Apply lids and screw bands until fingertip tight.
Step 7: Water Bath Process
Place jars into a boiling water bath canner.
Ensure jars are covered by at least one inch of water.
Process:
- Half-pints: 15 minutes
- Pints: 20 minutes
Adjust processing time for elevations above 1,000 feet according to standard canning guidelines.
Step 8: Cool
Remove jars carefully.
Place on a towel.
Allow to cool undisturbed for 12–24 hours.
Check seals.
Lids should not flex when pressed.
Store any unsealed jars in the refrigerator.
Storage
Store sealed jars in a cool, dark place.
Properly processed jars keep for up to 1 year.
Refrigerate after opening.
Consume within 3 weeks.
Serving Ideas
This vintage salad pairs wonderfully with:
- Fried chicken
- Ham sandwiches
- Barbecue
- Roast beef
- Baked potatoes
- Pinto beans
- Meatloaf
- Burgers
- Grilled sausage
- Pulled pork
It also makes a delicious topping for hot dogs or sandwiches.
Tips for Success
- Use only fresh, crisp vegetables.
- Use vinegar with 5% acidity.
- Do not reduce the vinegar amount, as it ensures safe acidity for canning.
- Pickling salt keeps the brine clear.
- Avoid iodized table salt, which can cloud the liquid.
- Pack vegetables firmly but do not crush them.
- Remove air bubbles before sealing.
- Let flavors develop for 2–3 weeks before opening for the best taste.
Flavor Variations
Try customizing your salad by adding:
- Thinly sliced cauliflower
- Green tomatoes
- Jalapeños for heat
- Sweet onions
- Dill seed
- Fresh garlic cloves
- Sliced celery
- Yellow bell peppers
Keep the total vegetable quantity about the same and do not alter the vinegar-to-water ratio.
Why It’s Called Depression-Era Salad
During the Great Depression, families relied on affordable, homegrown vegetables and preserved as much of their harvest as possible. Canning allowed them to enjoy nutritious foods year-round while minimizing waste. Sweet-and-sour pickled salads became pantry staples because they used simple ingredients that were widely available and stretched meals during difficult times.
Frequently Asked Questions
Can I use apple cider vinegar?
Yes, as long as it has 5% acidity. It will give the salad a slightly richer, fruitier flavor.
Can I reduce the sugar?
Reducing sugar may change the flavor and texture. It is best to keep the recipe as written for balanced results.
Why soak the vegetables in salt?
Salting removes excess moisture, helping the vegetables stay crisp after canning.
Can I freeze this instead?
Yes, but the vegetables will soften after thawing. Canning provides the best texture for long-term storage.
How long should I wait before eating it?
For the fullest flavor, allow the jars to rest for at least 2 weeks before opening.
This old-fashioned canned Depression-Era Salad is a timeless pantry favorite that combines crisp vegetables with a bright, tangy-sweet brine. Whether you’re preserving a backyard harvest or simply enjoying a taste of history, this recipe offers a delicious and practical way to keep wholesome vegetables on hand all year long.