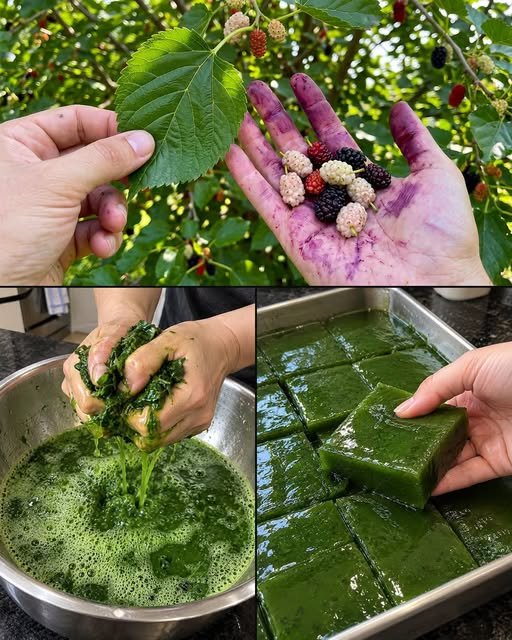
Mulberry leaves are a wonderful natural ingredient that can be used to prepare refreshing homemade herbal jelly. They have a mild, earthy flavor and produce a beautiful natural green color when processed properly. With a few simple kitchen ingredients, fresh mulberry leaves can be transformed into a smooth, soft, delicious green jelly that can be cut into cubes and served as a dessert or refreshing snack.
The process shown in the pictures involves collecting fresh mulberry leaves, washing and squeezing them to extract their green juice, and preparing a thick mixture that sets into beautiful green jelly squares.
This recipe is perfect for people who enjoy homemade desserts and experimenting with natural ingredients. Instead of relying on artificial green food coloring, the recipe uses the natural color extracted from fresh leaves.
1. Ingredients Required
Here are the ingredients needed to prepare homemade mulberry leaf jelly.
| Ingredient | Quantity |
|---|---|
| Fresh mulberry leaves | 200 grams |
| Drinking water | 1.5 liters |
| Cornstarch | 100 grams |
| Agar-agar powder | 5 grams |
| Sugar | 100–150 grams |
| Lemon juice | 1 tablespoon |
| Salt | A small pinch |
Optional ingredients:
- A little honey for additional sweetness.
- Coconut milk for serving.
- Fresh fruit for decoration.
- Vanilla extract for a pleasant aroma.
The amount of sugar can be adjusted according to your taste. If you prefer a less sweet dessert, use a smaller quantity.
Important: Use only positively identified, pesticide-free, food-grade mulberry leaves. Do not assume that every similar-looking garden leaf is edible.
2. Harvesting Fresh Mulberry Leaves
The first step is collecting fresh mulberry leaves.
Choose young, healthy, green leaves from a clean mulberry tree. Younger leaves are generally more tender and easier to process than old, tough leaves.
Follow these steps:
- Select fresh leaves without visible insect damage.
- Avoid yellow, dry, or diseased leaves.
- Collect approximately 200 grams of leaves.
- Remove thick stems and unwanted plant material.
- Place the leaves in a clean basket.
If possible, harvest the leaves in the morning when they are fresh.
Avoid collecting leaves from trees that may have been sprayed with pesticides or exposed to roadside pollution.
3. Washing the Leaves Properly
Washing is an important step because leaves may contain dust, soil, insects, and other unwanted particles.
First, place the harvested leaves in a large bowl filled with clean drinking water.
Gently move the leaves around with your hands to remove dirt.
Drain the water and repeat the process two or three times until the leaves are clean.
Next, place the washed leaves in a strainer and allow excess water to drain.
You can also gently pat them dry using a clean kitchen towel.
Proper washing helps produce a cleaner, fresher green extract.
4. Preparing the Natural Green Leaf Extract
This is one of the most important stages of the recipe.
The goal is to extract the natural green color and soluble components from the mulberry leaves.
Method:
- Cut the clean leaves into smaller pieces.
- Place them in a blender.
- Add approximately 500 ml of drinking water.
- Blend until the leaves become finely crushed.
- Pour the mixture through a clean fine-mesh strainer.
- Press the pulp gently with a spoon to collect the liquid.
- Filter again using a clean muslin cloth if necessary.
You should obtain a green liquid containing the natural color extracted from the leaves.
If you want to follow the traditional hand-squeezing approach shown in the picture, crush the leaves in a clean bowl with a little water and squeeze the mixture through a clean cloth.
Do not discard the remaining pulp immediately. It can be composted.
Tip: Avoid prolonged heating of the green extract because excessive heat can affect its natural color.
5. Preparing the Jelly Mixture
Now it is time to turn the green extract into a delicious jelly.
For this recipe, cornstarch provides body while agar-agar helps the jelly set into firm, sliceable pieces.
First, measure the green extract. Add enough drinking water to bring the total liquid quantity to approximately one liter.
Take a separate bowl and add 100 grams of cornstarch.
Pour approximately 200 ml of the cool green liquid into the cornstarch.
Mix thoroughly until no lumps remain.
In a separate cooking pot, add the remaining green liquid, sugar, salt, and agar-agar powder.
Mix everything together and bring it to a gentle boil while stirring.
Allow the agar-agar to dissolve completely according to the product instructions.
Now slowly pour the prepared cornstarch mixture into the hot liquid.
Keep stirring continuously to prevent lumps from forming.
Cook over low to medium heat until the mixture becomes thick, smooth, and glossy.
This usually takes approximately 5–8 minutes, depending on the stove and ingredients.
If the mixture becomes too thick, add a little hot water and stir until the desired consistency is reached.
6. Pouring the Mixture Into a Tray
Once the mixture reaches a smooth and thick consistency, remove the pot from the heat.
Prepare a clean rectangular stainless steel tray or glass container.
Lightly rinse the tray with water or apply a very thin layer of neutral cooking oil.
Carefully pour the hot green mixture into the tray.
Use a spoon or spatula to distribute it evenly.
Gently tap the tray against the countertop to release trapped air bubbles.
Make sure the surface is reasonably smooth so that the final jelly has an attractive appearance.
Allow the mixture to cool at room temperature until it begins to set.
Do not move the tray unnecessarily during this stage.
7. Cooling and Setting the Green Jelly
After pouring the mixture, leave it undisturbed until it cools.
Once it reaches room temperature, place the tray inside the refrigerator.
Allow approximately 2–3 hours for the jelly to become fully firm.
The exact setting time depends on the thickness of the mixture and the amount of agar-agar used.
When properly prepared, the jelly should have a smooth surface and a soft but firm texture.
It should hold its shape when lifted but remain pleasant to bite.
Avoid freezing the jelly because freezing can damage its texture.
8. Cutting the Jelly Into Beautiful Squares
This is the most satisfying part of the entire preparation process.
Once the jelly has completely set, remove the tray from the refrigerator.
Run a clean knife around the edges to loosen the jelly.
Place the tray on a clean cutting surface or cut the jelly directly inside the tray.
Use a sharp knife to cut it into equal-sized squares.
You can make small cubes for dessert bowls or larger squares for individual servings.
The finished pieces should have a beautiful green color and a smooth, glossy appearance.
Arrange the jelly cubes on a serving plate.
9. How to Serve Mulberry Leaf Jelly
There are several delicious ways to enjoy your homemade green jelly.
Option 1: Coconut milk dessert
Place several green jelly cubes in a bowl and pour chilled coconut milk over them. Add a little sugar syrup for sweetness.
Option 2: Fresh fruit jelly
Combine the jelly cubes with chopped mangoes, bananas, apples, or strawberries.
Option 3: Chilled sweet jelly
Serve the cubes with a little honey or sugar syrup and crushed ice.
Option 4: Milk dessert
Add the green jelly cubes to a glass of chilled milk. A little vanilla can provide additional flavor.
These serving ideas make the jelly suitable for family gatherings, summer refreshments, and homemade dessert platters.
10. Storage and Important Tips
To maintain freshness and quality, store the prepared jelly in an airtight food-grade container in the refrigerator.
For the best quality, consume it within 2–3 days.
Keep the jelly refrigerated and do not leave it at room temperature for extended periods.
Here are some additional tips:
- Always use fresh, clean, correctly identified mulberry leaves.
- Do not use leaves from chemically treated trees.
- Strain the green extract carefully to remove unwanted fibers.
- Mix cornstarch with cold liquid before adding it to the hot mixture.
- Stir continuously while cooking to prevent lumps.
- Use the correct quantity of agar-agar to achieve a firm texture.
- Avoid excessive heating of the leaf extract if you want to preserve its green appearance.
- Keep all utensils and containers clean.
Remember that the natural green color may vary depending on the freshness, variety, and quantity of leaves used.
11. Final Result: Homemade Natural Green Jelly
Your homemade mulberry leaf green jelly is now ready!
What begins as fresh green leaves from a mulberry tree becomes a beautiful homemade dessert through washing, crushing, extracting, cooking, cooling, and cutting.
The finished jelly has an attractive green appearance, a soft and smooth texture, and can be enjoyed with coconut milk, fresh fruit, or a little natural sweetener.
It is also an interesting way to explore traditional plant-based food preparation at home.
Recipe summary:
- Preparation time: 20–30 minutes
- Cooking time: 10–15 minutes
- Cooling and setting: 2–3 hours
- Difficulty: Moderate
- Main ingredient: Fresh mulberry leaves
- Texture: Smooth, soft, and sliceable
- Storage: Refrigerated for 2–3 days
A final note: Mulberry leaves are used in some traditional foods, but this particular jelly recipe is a culinary adaptation based on the process visible in the photograph. It should be enjoyed as a dessert, not treated as a medicine or a proven treatment for any health condition.