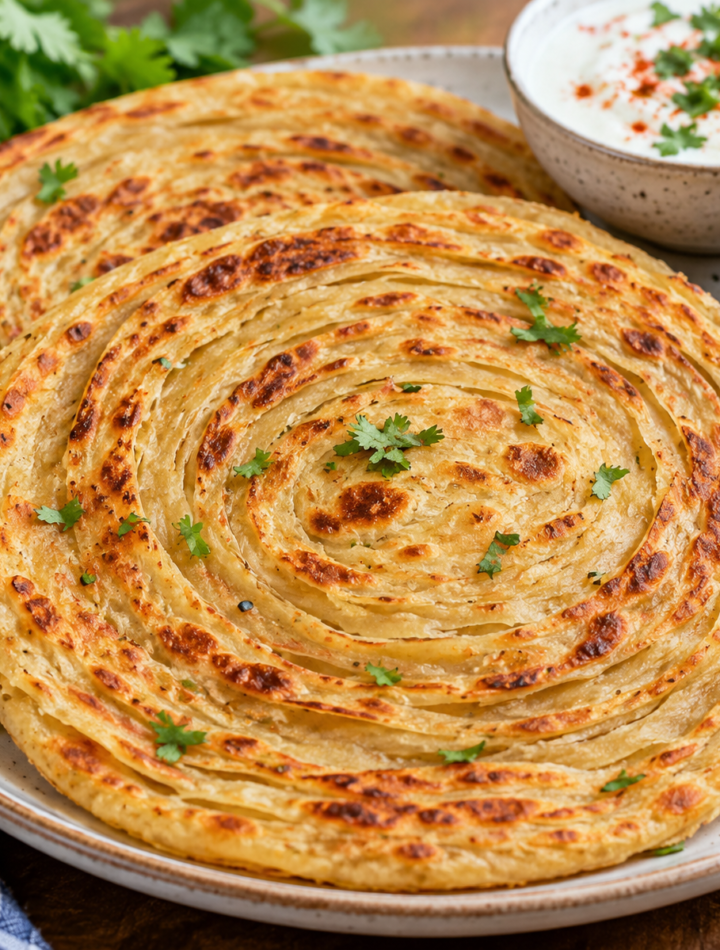
Lacha Paratha is a popular South Asian flatbread known for its crisp, flaky layers and rich, buttery texture. The word “lacha” refers to the visible layers or coils that form when the dough is folded, rolled, and cooked. Unlike an ordinary roti or paratha, Lacha Paratha has a beautiful spiral appearance and a delightful contrast between crisp edges and soft, tender layers inside.
This homemade version uses simple pantry ingredients and a few easy techniques to create restaurant-style parathas right in your kitchen. Serve them hot with curry, dal, grilled meats, eggs, yogurt, or your favorite pickle.
Ingredients
For the Dough
- 3 cups all-purpose flour or atta
- 1 teaspoon salt
- 1 teaspoon sugar
- 1 tablespoon cooking oil
- ¾ to 1 cup warm water, as needed
- 2 tablespoons plain yogurt, optional
For Layering
- 4–5 tablespoons melted ghee or butter
- 3–4 tablespoons dry flour
- Extra oil or ghee for cooking
Instructions
1. Prepare the Dough
Add the flour, salt, and sugar to a large mixing bowl. Stir everything together. Add the cooking oil and yogurt if using, then gradually pour in warm water while mixing with your fingers or a spoon.
Once the dough begins coming together, knead it until you have a soft, smooth dough. The dough should be soft and slightly elastic but not sticky. If it feels dry, add a little more water, one tablespoon at a time.
Knead for approximately 7–10 minutes. This step is important because proper kneading develops the gluten that helps create soft, flexible layers.
Cover the dough with a clean kitchen towel or plate and let it rest for at least 20–30 minutes. Resting makes the dough much easier to roll and helps prevent it from shrinking.
2. Divide the Dough
After resting, knead the dough gently for another minute. Divide it into 6–8 equal portions, depending on the size of parathas you want.
Shape each portion into a smooth ball. Keep the dough balls covered while working so they do not dry out.
3. Roll the First Layer
Take one dough ball and lightly dust your work surface with flour. Roll it into a very thin circle or oval. It does not have to be perfectly round.
Brush the surface generously with melted ghee or butter. Sprinkle a light layer of dry flour over the ghee. This combination helps separate the layers during cooking.
4. Create the Lacha Layers
There are several ways to create the layers. One of the easiest methods is to make thin pleats.
Starting from one edge, fold the rolled dough back and forth like an accordion, creating long, narrow pleats. Once the entire sheet has been folded, gently stretch the strip slightly.
Now coil the pleated dough into a spiral, tucking the loose end underneath. Do not press the coil too firmly because you want the layers to remain distinct.
Repeat the process with the remaining dough balls.
Let the prepared coils rest for another 5–10 minutes. This short rest relaxes the dough and makes the final rolling easier.
5. Roll the Paratha
Take one coiled dough ball and dust it lightly with flour. Using gentle pressure, roll it into a round paratha approximately 6–8 inches wide.
Avoid rolling too aggressively. Pressing too hard can flatten the layers and reduce the characteristic flaky texture.
If the dough resists rolling, allow it to rest for a few more minutes before continuing.
6. Cook the Lacha Paratha
Heat a heavy skillet or tawa over medium heat. Once hot, place the rolled paratha on the pan.
Cook for about 30–60 seconds, or until small bubbles begin appearing on the surface. Flip the paratha and brush the cooked side with a little ghee or oil.
Cook the second side for another minute, then flip again. Continue cooking while gently pressing the edges and center with a spatula.
Brush with a little more ghee or oil and cook until both sides are golden brown with darker toasted spots.
The paratha should be crisp on the outside while remaining soft and flaky inside.
7. Separate the Layers
Remove the cooked paratha from the skillet and place it on a plate. For especially flaky layers, gently clap or squeeze the paratha between your hands while it is still hot. This helps loosen the layers and gives the paratha its classic texture.
Repeat with the remaining dough.
Tips for Perfect Lacha Paratha
Use enough fat: Ghee or butter between the layers is essential. It helps create separation and gives the paratha its rich flavor.
Rest the dough: Don’t skip the resting periods. Relaxed dough rolls more easily and produces softer parathas.
Roll gently: The goal is to flatten the coil without completely destroying the folds. Use light, even pressure.
Control the heat: Medium heat works best. If the skillet is too hot, the outside may burn before the inside cooks. If it is too cool, the paratha can become dry and hard.
Keep uncooked dough covered: Exposed dough can develop a dry surface, making it difficult to roll smoothly.
Use ghee for extra flavor: Cooking with ghee produces wonderfully crisp, aromatic layers, although vegetable oil can also be used.
Serving Suggestions
Lacha Paratha is incredibly versatile. Serve it hot alongside chicken curry, butter chicken, chickpea curry, lentils, beef or vegetable stew, or creamy paneer dishes.
For breakfast, pair it with scrambled eggs, omelets, yogurt, or spicy potatoes. A spoonful of mango pickle or mint chutney adds a wonderful burst of flavor.
You can also serve freshly cooked parathas with plain yogurt and a cup of hot tea for a simple and satisfying meal.
Storage and Reheating
Fresh Lacha Paratha tastes best immediately after cooking, but leftovers can be stored in an airtight container or wrapped tightly in foil and refrigerated for up to 3 days.
To reheat, place the paratha on a hot skillet for a minute or two on each side. You can add a tiny amount of ghee to restore some of its crispness.
For longer storage, uncooked rolled parathas can be layered with parchment paper and frozen. Cook them directly from frozen on a hot skillet, adding a little extra cooking time as needed.